Create conferences
A conference is a single, multi-day event that can encompass multiple sessions or smaller events within it. Common uses for conferences include workshops, orientation/trainings, festivals, celebrations or special series.
- Fill out the event name and the first day of your multi-day event and end date. Click “Save Basic Info” to continue.
- Important! The conference name must not exceed 115 characters, including spaces.
- Your "Conference Details" section will now expand with new fields to enter.
- Add your event description and select the "live" status.
- Note, you can return to this field to update the status of the conference if you need to mark it as canceled, postponed, or sold out.
- Select your experience and add your location.
- Enter in your event location’s name and press “enter” followed by address and additional details or select from one of the UC San Diego places stored in the system.
- The platform has several key UC San Diego places stored in the system which you can type in and select to auto-generate the details. You can add additional place details in the “Room” field once selected.
- Select an event photo for your event header from the photo library or upload your own and edit in the built-in editor.
- The recommended image size is 1920 x 1245 pixels (or similar aspect ratio), PNG or JPG file type, and smaller than 1MB (Images cannot exceed 10mb and 5000 by 5000 pixels, however it is highly recommended that the filesize stay under 1mb for optimal page load speed).
- If your image doesn’t match the recommended resolution, you can adjust it using the photo editor. Drag to reposition and zoom in or out as needed. Only the area within the transparent black or checkered frame will be visible on your event page.
- Add a short description of the image in the “Photo Description” field for accessibility purposes
- Make it concise and descriptive.
- Avoid phrases like “image of” or “photo of”. Screen readers will already announce it’s an image.
- If your image is only decorative design you can add “” in place of a short description.
- Image Best Practices
- Avoid images with embedded text.
- Screen readers cannot parse embedded text and it does not scale well on mobile.
- Do not upload a flyer image in the 'Photo' field. If no image is added, a placeholder graphic will appear automatically. You can choose an image from the photo library by clicking “Choose from Photo Library” if you do not have a suitable image.Event Header Image Best Practices
- Choose high-contrast and clear images
- Helps users with low vision or color blindness.
- Optional: Upload a logo. The logo will be featured at the top of the page above the event header. File must be jpeg or png. SVG logo files will result in a broken image.
- We recommend you click "Save Changes" at the bottom right of the page to save current progress on this section before continuing down to "Classifications".
- Enter in the event classification information.
- Important! Select your Group as well as any keywords and tags to ensure that your event is feeding into the proper widgets and webpages.
- Event Type and Audience: Event type and audience classifications help categorize and display your event when users search and sort their event listings.
- Exhibits: For ongoing programs like art exhibits, make sure you tag your event type as “Exhibit” so that your listing feeds into the Exhibit tab on the homepage.
- Neighborhood: If applicable, you can assign your group to a UC San Diego neighborhood. This helps users find events at a particular venue through the Places pages.
- If your event does not take place in a listed Neighborhood please disregard this field.
- Pending Feature: Event details to display on neighborhood kiosks.
- Speakers: Feature speakers by typing them into the “Speaker” field.
- You will have to add new speakers under “Classifications” if your speaker is not already in the system.
- Enter in additional details to help your users find your event
- Add a hashtag. Platform can only display one hashtag.
- Add a link to a supporting website such as your organization’s page or a page with additional event information or resources. Platform can only display one website.
- Vanity URL: Create a custom URL suffix or use the automatically generated one.
- Owner: You are by default the owner of the event. If you need to transfer ownership, please add the new owner's email address into this field.
- We recommend you click "Save Changes" at the bottom right of the page to save current progress on this section before continuing down to "Event Insights".
- For events using the Localist ticketing system, the platform will send registrants an email with a short survey. Collect user insight after the event day by checking the "Request post event feedback from attendees" box.
- The feature is limited to the 5 standard questions and currently does not support custom questions. Question 1 is required by default if using this feature. You can disable questions 2-5 if you don't find them necessary. Learn more at Localist’s Event Insights webpage.
- How would you rate this event?
- How likely are you to attend another event from this group?
- Did you connect with someone at this event that you didn’t know before
- How likely are you to recommend events from this community to a friend or colleague?
- How informative was this event?
- To view insights, go to the event’s editing dashboard, click the “metrics” dropdown menu, and “insights”.
- User Engagement: “User Engagement” features have been disabled system wide and cannot be enabled. Please disregard this section.
- Visibility: Set who can see your event
- Public: Your event will display on the calendar website and any applicable calendar feeds.
- Unlisted: Your event will not display on the calendar website, but can be accessed through the URL.
- Restricted: Users will need to be logged into the platform to view and register for the event.
- Promotion: Based on your permission level, you can add the event to the top featured section of the calendar pages.
- Sponsored Event: Check “Boost this event to place it higher in trending events and mark it as a sponsored event” to boost the event in the trending algorithm. This will help send it straight to the top of the trending list. This feature is only available for certain permission levels.
- Click "Save Changes" at the bottom right of the page to save your progress progress.
- After entering the conference details, you can build a schedule by adding individual sessions under the main conference. To begin, click the "Schedule" tab at the top of the panel.
- Click "Add Session" to begin adding sessions to the main event.
- Similar to building an event, each session will have the same fields and settings to enter.
- Sessions are treated as individual events but are housed under the main conference.
- Optional: Use the Localist ticketing feature to collect individual session registrations.
- When finished:
- Click "Save and Close" to stop adding sessions, or
- Click "Save and Add Another" to continue adding more.
- Click on the "Tickets & Registration" tab at the top of the panel.
- You have the following three ticketing options for your event page.
- You can use your own ticketing and registration platform by adding your ticketing info and external ticketing URL.
- Use the platform’s free ticketing feature to collect registration for your event.
- Watch this video by Localist for an in depth walkthrough of ticketing or follow the steps below.
- Note: The current platform is unable to support paid events.
- No ticketing and registration. Your event page will have no registration option and will be informational only.
Option 1: Use Your Own Event Ticketing/Registration Platform
- To use your own ticketing or registration platform, uncheck the “Use Localist Register” to see the following fields to enter your ticketing information.
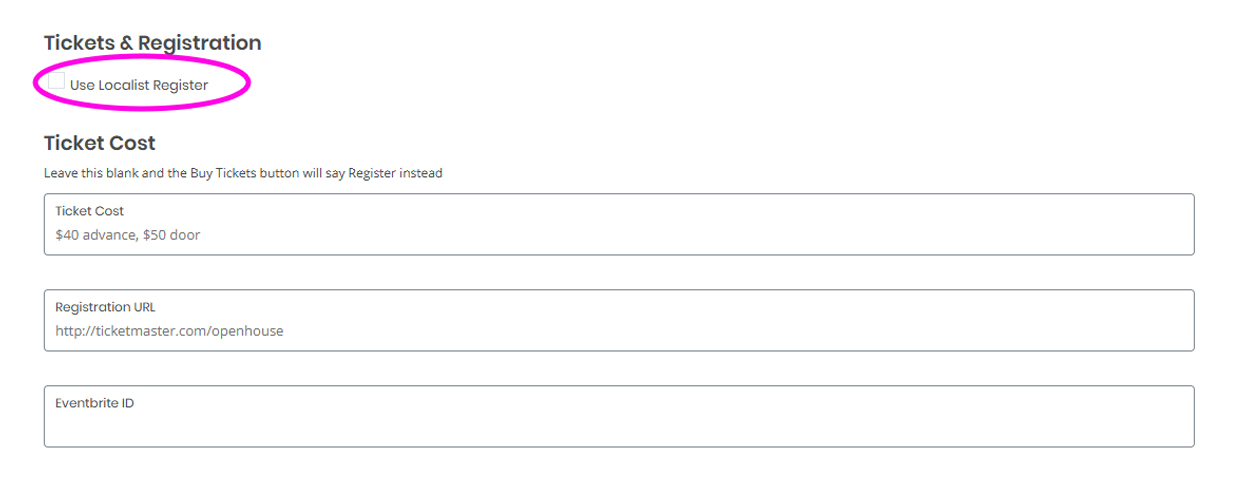
- Enter your ticketing details in the “Ticket Cost” field.
- Enter the URL to your external ticketing/registration page.
- If you have an Eventbrite ID, you can add the ID here to sync to an Eventbrite page.
- Click 'Save and Continue'.
Option 2: Use the Localist Ticketing/Registration Platform
Enable Ticketing and Create Ticket Options
- Ensure that the checkbox “Use Localist Register” is checked. This will enable the ticketing settings.
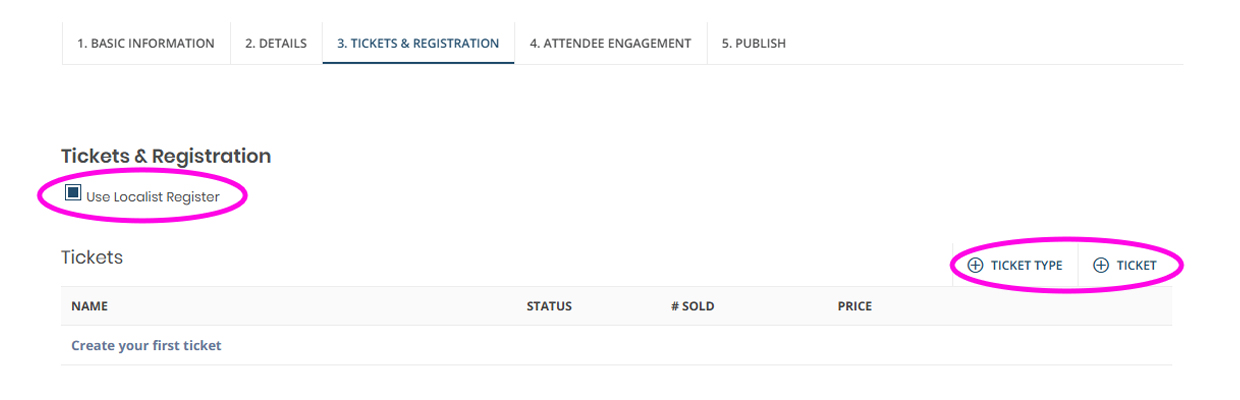
- The current ticketing feature will only support free events and cannot support paid events.
- Click “+ Ticket” to add a ticket option and enter in ticket details.
- You can click “Additional ticket options” under the price field for advanced settings including setting availability date range, number of tickets available and also limit the number of tickets each registrant can add.
- While the system does not currently support paid events, you can still take advantage of the promo code feature by clicking on the “Hidden” checkbox. This will allow you to create a promo code that unlocks a hidden ticket option when a user enters it.
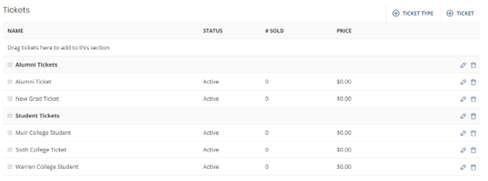
- If you have multiple ticketing options and want to organize them in categories, you can add a “Ticket Type” by clicking on “+ Ticket Type” to create categories for your user.
- i.e.
- If you have any hidden tickets, create a promo code and select the associated ticket to use the hidden ticket feature. Click “save promo code” to save code.
- Continue to the “Event Capacity” section to add your registration limit.
- Leave it blank if you do not have a capacity limit.
- Click 'Save and Continue'
Collect User Information
Every event will require a name and email address for each ticket. Note, the same email address can be used for multiple tickets.
To collect additional information click on “+ Attendee Question” in the “Attendee Question” section to add a short open field question or a single select multiple choice dropdown field.
Please note: Conditional fields are currently not available in ticketing.
Option 3: No Ticketing & Registration
- Do not check the “Use Localist Register” box.
- Leave “Ticket Cost”, “Registration Field”, and “Eventbrite ID” fields blank.
- Click 'Save and Continue'.
- Click on "View Conference" to review your conference page.
- When you’re ready to publish the event, click on the “Publish this event” link at the top right of the page next to "Metrics".
- Note, this link is in very small font size.
- To track who is registering for the conference, you can return to the event and click on "View Confirmed Tickets" at the top right.