Create Event: Details
Event creation is organized into five steps (tabs). This guide focuses on the second step, where you’ll upload an event image and provide additional event details.
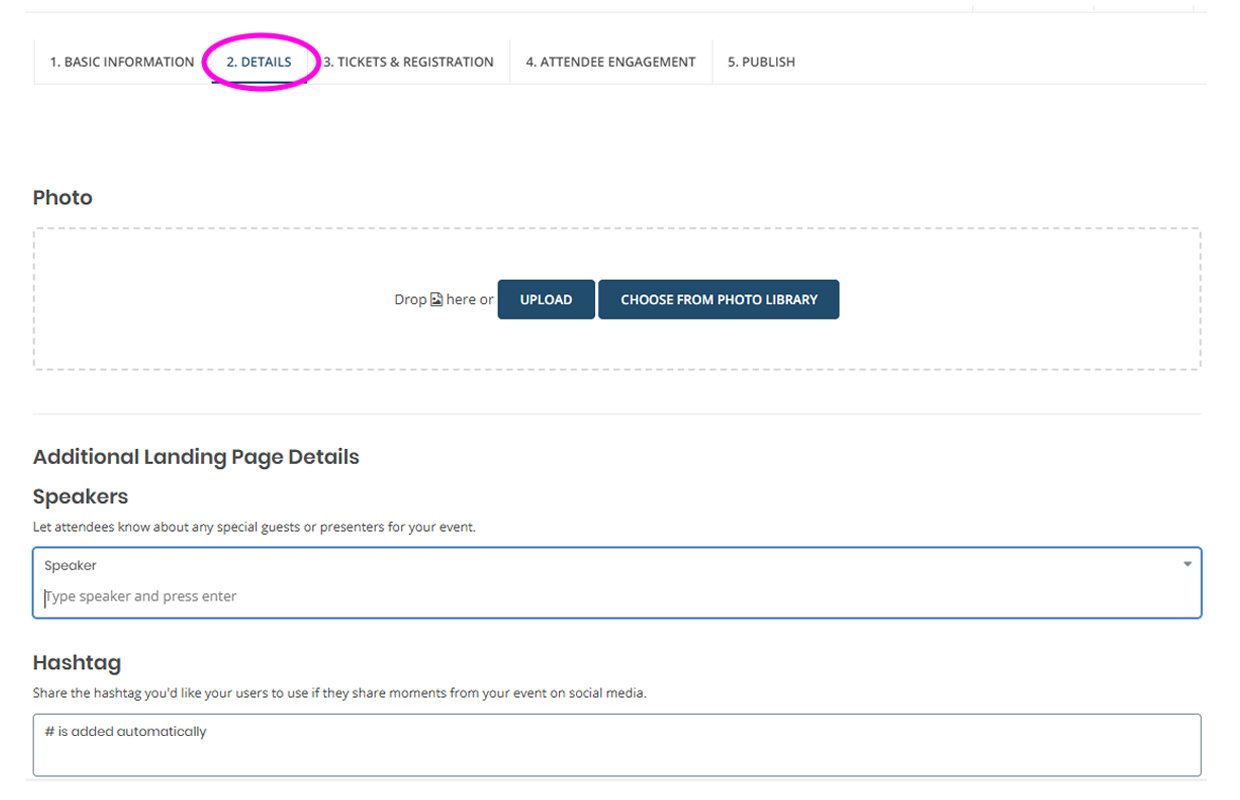
Select the Second Tab: Details
- Enter Details: Fill out the additional fields and click on “Save and Continue”.
- Select a header photo from the library or upload your own. If it doesn’t fit the frame, use the editor to drag, reposition, or zoom with your mouse wheel or the slider below. For different framing options, click the pencil icon and choose "Adjust Cropping". Only the area inside the transparent frame will appear on your event page.
- The recommended image size is 1920 x 1245 pixels (or similar aspect ratio), smaller than 1MB, and in JPG or PNG format. Please keep the file size under 1 MB and the image dimensions below 2000 × 2000 pixels to ensure optimal page load speed and to prevent display issues.
- Event Header Image Best Practices
- Add a short description of the image in the “Photo Description” field for accessibility purposes.
- Make it concise and descriptive.
- Avoid phrases like “image of” or “photo of”. Screen readers will already announce it’s an image.
- If your image is only decorative design you can add “” in place of a short description.
- Avoid images with embedded text.
- Screen readers cannot parse embedded text and it does not scale well on mobile.
- Choose high-contrast and clear images.
- Helps users with low vision or color blindness.
- Feature any speakers by typing their names into the “Speaker” field. If your speaker is not already in the system or needs edits, follow the steps below.
- Add or Edit Speakers:
- Click on “Classifications” on the left panel and then clicking "Speakers".

- On the top right of the speakers section, click on "+Add Speaker" to add a new speaker or click on an existing speaker name to make updates.
- Enter in your speaker info, and click on "Save Changes" to save your speaker.
- Speaker Image: Consider using an image with a square aspect ratio (e.g., 500x500 pixels) and a centered composition of the person. You can use the editor to reposition and zoom in or out as needed.
- After your speaker is saved, return to your event page editor and type in your speaker name to add the speaker to the event page.
- Add a hashtag.
- Platform can only display one hashtag.
- Add a link to a supporting website such as your organization’s page or a page with additional event information or resources.
- Platform can only display one website.
- Event Contact: Please provide contact name and email address. (I.E. King Triton | kingtriton@ucsd.edu)
Important! If you leave this field blank, page visitors will not have a way to reach you with questions or requests for more information.
- Vanity URL: Create a custom URL suffix or use the automatically generated one.
- Click 'Save and Continue'.
Step Guide
Step 2: Details
Add image and other details.