Create Events
Watch this video by Localist for a deeper understanding to add all kinds of events.
From your Admin Dashboard click on “Add Event” either in the left navigation or on the dashboard page in the “Manage Events” section. If you don't have access to the administration dashboard you will need to request elevated permissions for your account. Request permission here.
You will be directed to a 5 step/tab process to create your event.
Throughout the five sections you will see an EventReach score for your event. EventReach is a metric to measure the expected “reach,” or audience awareness, of an event. The choices and fields you include will update your score. A healthy EventReach score will fall around or above 70%.
Important! For a single event that spans over multiple days please create your event as a Conference. A conference is a single, multi-day event that can encompass multiple sessions or smaller events within it. Learn how to create a conference
Step 1: Enter Basic Information
Select the first tab: 1. Basic Information
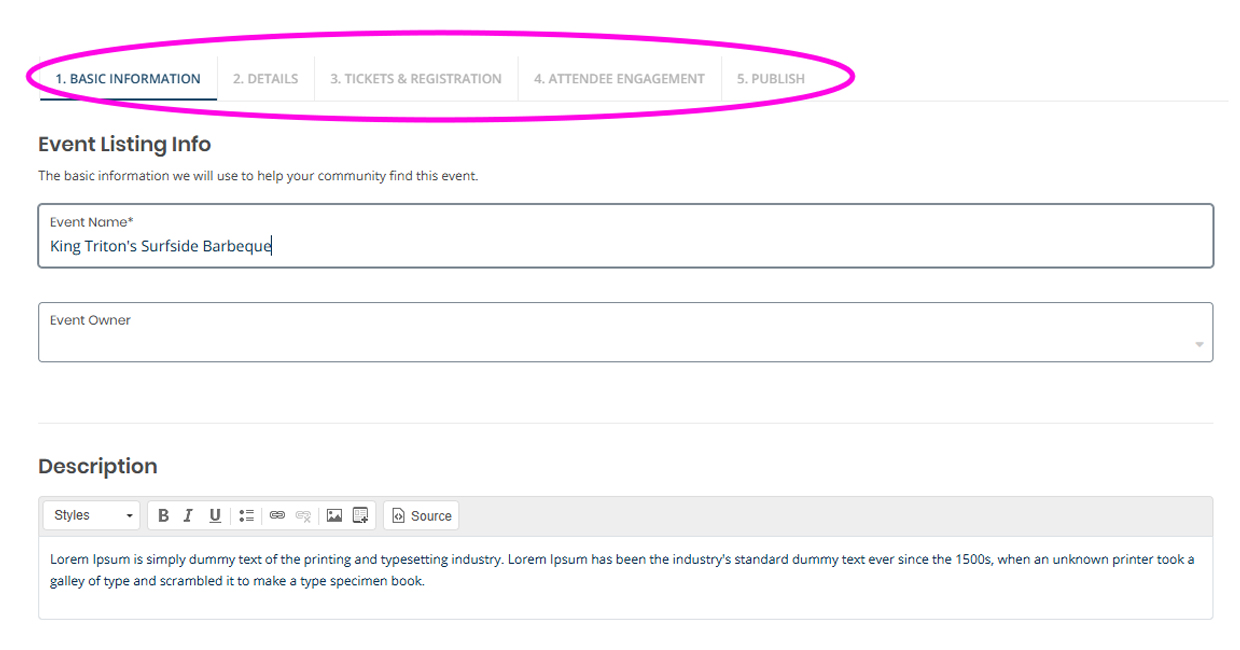
Fill out the following sections and click “Save and Continue” on the bottom right of the screen.
- Add your event name and description.
- Add your event date(s) and times then click on “Include above in schedule” to save.
- You can set your event to be recurring by selecting an option from the “Repeating” field.
- Recurring events will only be listed once in your dashboard with the various confirmed dates, but will display individual calendar listings on the website.
- If your event is recurring, but details such as speakers, subject matter or locations change between the dates, we recommend creating the event as a “Never” repeating event and copy it as a new event.
- Watch this Recurring events video by Localist.
- You can set your event to be recurring by selecting an option from the “Repeating” field.
- Select your experience and add your location.
- Enter in your event location’s name, address and additional details.
- The platform has several key UC San Diego places stored in the system which you can type in and select to auto-generate the details. You can add additional place details in the “Room” field once selected.
- Enter in your event location’s name, address and additional details.
- Enter in the event classification information.
- Important Requirement! Enter your group name in the 'Group' field to ensure you can access your event after saving or publishing it. If you don’t add a group, your event will not appear in your administration dashboard. Please contact Calendar Support if you are unable to locate your event.
- Event Type and Audience: Event type and audience classifications help categorize and display your event when users search and sort their event listings.
- Exhibits: For ongoing programs like art exhibits, make sure you tag your event type as “Exhibit” so that your listing feeds into the Exhibit tab on the homepage.
- Student Life Calendar: Be sure to select the "Students" audience if you want your event to appear on the Student Life Calendar.
- Neighborhood: If applicable, you can assign your group to a UC San Diego neighborhood. This helps users find events at a particular venue through the Places pages.
- If your event does not take place in a listed Neighborhood please disregard this field.
- Pending Feature: Event details to display on neighborhood kiosks.
- Tags and Keywords: These are a simple way for grouping and directing your audience to short-term or ultra-specifically categorized events. You can add as many tags and keywords, but you will have to add them one at a time and press “enter” to set each tag.
- There is a 255 character limit, but highly recommended limiting the length much less as it will impact the user experience.
- Pre-existing tags and keywords will populate after entering at least two characters.
- Helpful tips for tags and keywords.
- Tags: Display publicly at the bottom of your event page
- Keep tags simple.
- There are no character limits, but tags are meant to be short simple words to help group and market the event.
- Reduce usage of organizational words. Use “Research Expo” rather than “UC San Diego Research Expo”.
- Consider what is expected by your community.
- Since Tags are visible on the front-end, always use language that is expected and used by the majority of your community.
- Use Tags as “Sub-Filters”.
- Since event types are an evergreen list, Tags are a perfect way to compliment these types and categories. You can use Tags to help organize and categorize your events. For example, if you have a “Volunteer” event type applied, you can consider Tagging events with “Fundraising”, “Tutoring”, “Mentoring” etc. These kinds of Tags provide additional context for users, without having to sacrifice concise and easy Filter navigation.
- Use tags to categorize your events by units within larger groups. For example, if your group is “Social Sciences” and want to specify events from a smaller unit you can add the “Economics.”
- Keep your list of Tags manageable.
- While Tags are meant to bring granularity, as a rule of thumb, they should always match several events so your platform can maintain consistency and reduce clutter. For instance, “Free Food” is a popular Tag as this could apply to a large subset of events. On the flip side, we’d recommend avoiding “Free Pizza” or “Free Cookies.”
- Avoid echoing other Classification.
- However, this does not mean that Tags should be parroting other Classifications. For instance, if you have “Volunteer” as a Filter, we’d caution against using Tags such as “Volunteering” or “Volunteer” but can you add these as keywords to help categorize further.
- Keep tags simple.
- Keywords: While Keywords are almost identical to Tags, they provide the added benefit of not being visible on the front-end. As such, they do not have to be recognizable or familiar to your community. This is when your team can confidently use shorthand or acronyms.
- You can add common misspellings to enhance searchability.
- Keywords may be limited to admin curation, but they can also be useful for users on the front-end. Imagine you’re hosting an event “Triton Barbecue”, you could add “BBQ” as a keyword so users can find your event searching using either word.
- You can add common misspellings to enhance searchability.
- Tags: Display publicly at the bottom of your event page
- 'Save and Continue' at the end of each tab
Important: Campus Calendar Administrators may add tags, keywords and promotional features to your events to increase their visibility across campus websites and channels. Please do not remove any newly added tags or keywords to ensure your event is effectively promoted throughout the university.
Step 2: Enter Details
Select the second tab: 2. Details
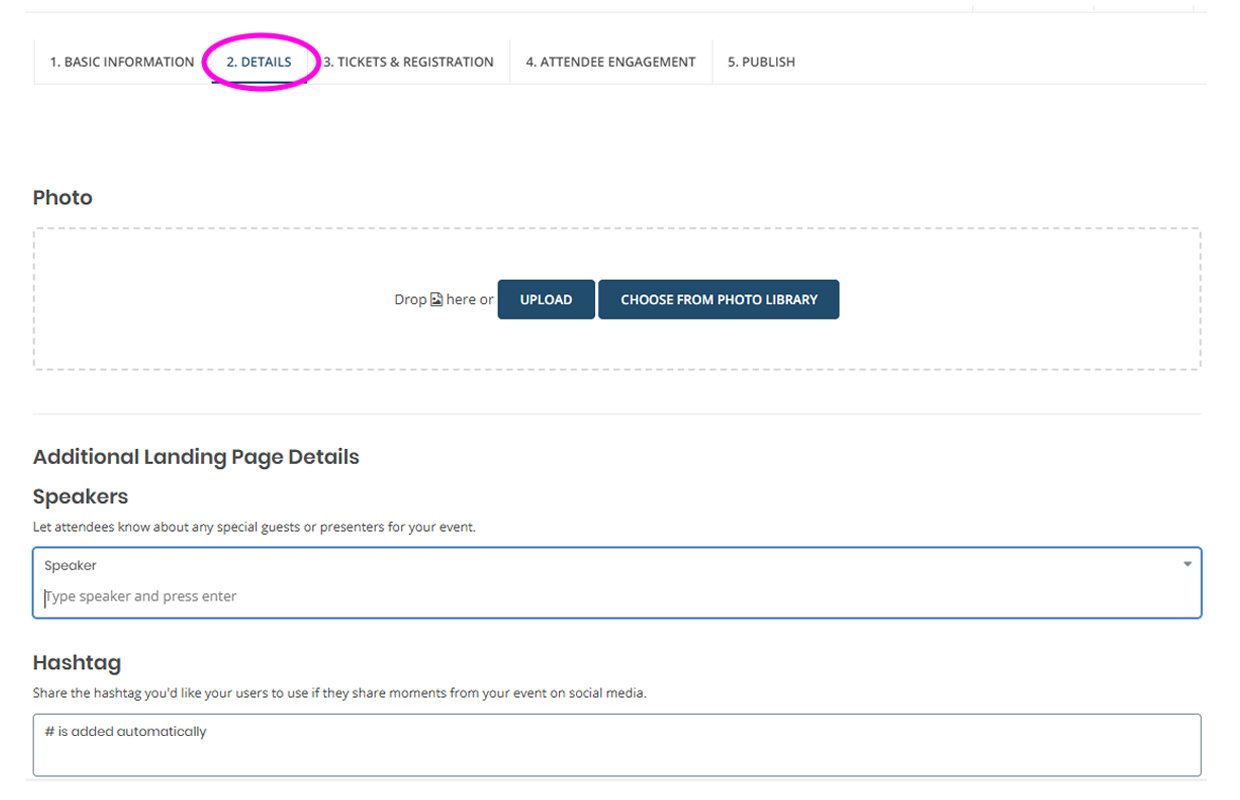
- Enter Details: Fill out the additional fields and click on “Save and Continue”.
- Choose an event photo for your header from the photo library or upload your own. Use the built-in editor to adjust the image. Drag to reposition and zoom in or out or click the pencil icon and click "Adjust Cropping" to further edit your image. Only the area within the transparent black or checkered frame will appear on your event page.
- The recommended image size is 1920 x 1245 pixels (or similar aspect ratio), smaller than 1MB, and in JPG or PNG format. Please keep the file size under 1 MB and the image dimensions below 2000 × 2000 pixels to ensure optimal page load speed and to prevent display issues.
- Event Header Image Best Practices
- Add a short description of the image in the “Photo Description” field for accessibility purposes.
- Make it concise and descriptive.
- Avoid phrases like “image of” or “photo of”. Screen readers will already announce it’s an image.
- If your image is only decorative design you can add “” in place of a short description.
- Avoid images with embedded text.
- Screen readers cannot parse embedded text and it does not scale well on mobile.
- Choose high-contrast and clear images.
- Helps users with low vision or color blindness.
- Add a short description of the image in the “Photo Description” field for accessibility purposes.
- Choose an event photo for your header from the photo library or upload your own. Use the built-in editor to adjust the image. Drag to reposition and zoom in or out or click the pencil icon and click "Adjust Cropping" to further edit your image. Only the area within the transparent black or checkered frame will appear on your event page.
- Feature any speakers by typing their names into the “Speaker” field. If your speaker is not already in the system or needs edits, follow the steps below.
- Add or Edit Speakers:
- Click on “Classifications” on the left panel and then clicking "Speakers".

- On the top right of the speakers section, click on "+Add Speaker" to add a new speaker or click on an existing speaker name to make updates.
- Enter in your speaker info, and click on "Save Changes" to save your speaker.
- Speaker Image: Consider using an image with a square aspect ratio (e.g., 500x500 pixels) and a centered composition of the person. You can use the editor to reposition and zoom in or out as needed.
- After your speaker is saved, return to your event page editor and type in your speaker name to add the speaker to the event page.
- Click on “Classifications” on the left panel and then clicking "Speakers".
- Add or Edit Speakers:
- Add a hashtag.
- Platform can only display one hashtag.
- Add a link to a supporting website such as your organization’s page or a page with additional event information or resources.
- Platform can only display one website.
- Vanity URL: Create a custom URL suffix or use the automatically generated one.
- Click 'Save and Continue'.
Step 3: Tickets and Registration
Watch this video by Localist for an in depth walkthrough of ticketing or follow the steps below.
Please note: the current platform is unable to support paid events.
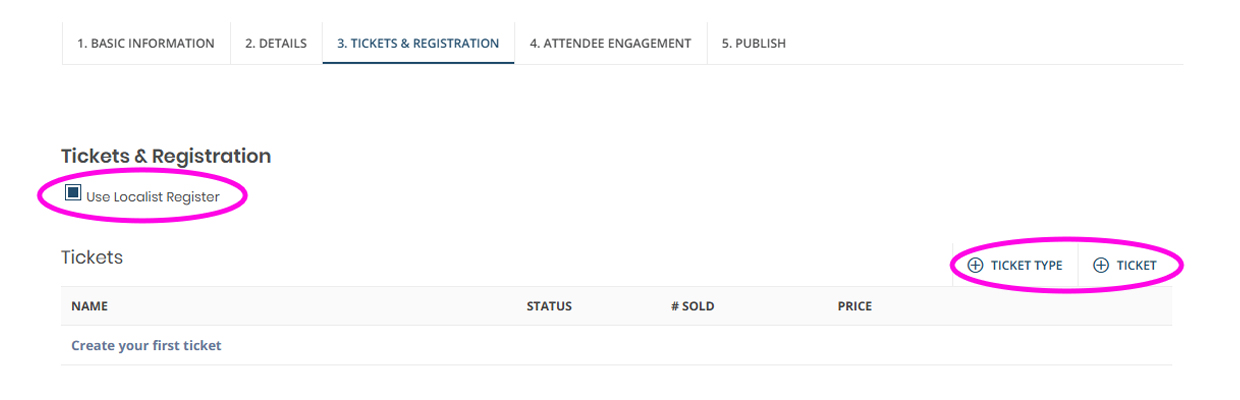
Select the third tab: 3. Tickets & Registration
You have the following three ticketing options for your event page.
- You can use your own ticketing and registration platform by adding your ticketing info and external ticketing URL.
- Use the platform’s free ticketing feature to collect registration for your event.
- No ticketing and registration. Your event page will have no registration option and will be informational only.
Option 1: Use Your Own Event Ticketing/Registration Platform
- To use your own ticketing or registration platform, uncheck the “Use Localist Register” to see the following fields to enter your ticketing information.
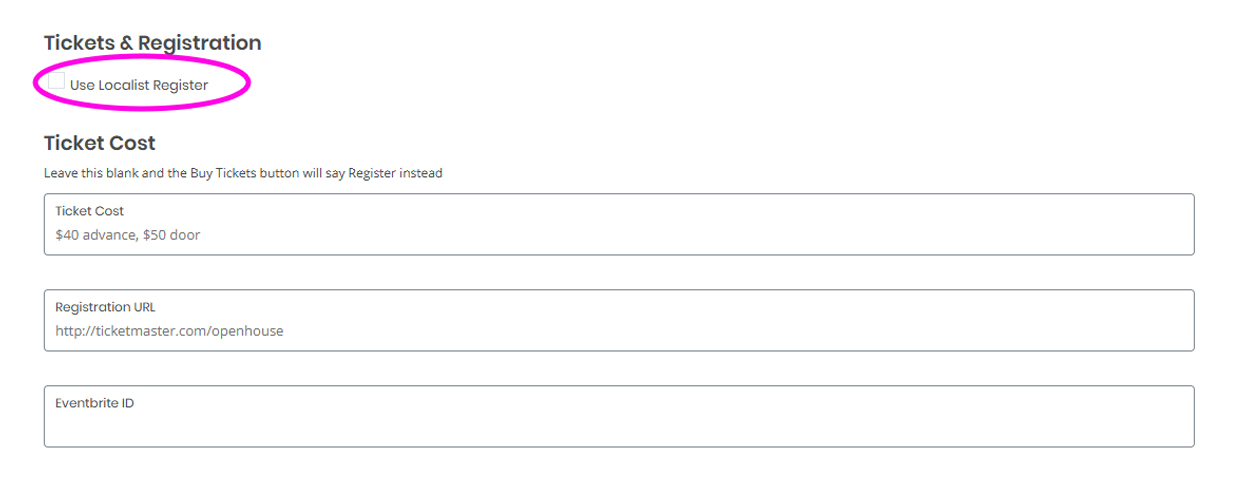
- Enter your ticketing details in the “Ticket Cost” field.
- Important: If you enter the word "Free", the system will automatically label your event as a "Free Event" on the public page.
- To avoid this, consider using terms like "complimentary" instead, or direct attendees to the event description for detailed ticketing information. You can add various ticket options and pricing in the description section within the "Basic Information" tab.
- To avoid this, consider using terms like "complimentary" instead, or direct attendees to the event description for detailed ticketing information. You can add various ticket options and pricing in the description section within the "Basic Information" tab.
- Important: If you enter the word "Free", the system will automatically label your event as a "Free Event" on the public page.
- Enter the URL to your external ticketing/registration page.
- If you have an Eventbrite ID, you can add the ID here to sync to an Eventbrite page.
- Click 'Save and Continue'.

Option 2: Use the Localist Ticketing/Registration Platform
Enable Ticketing and Create Ticket Options
- Ensure that the checkbox “Use Localist Register” is checked. This will enable the ticketing settings.
- The current ticketing feature will only support free events and cannot support paid events.
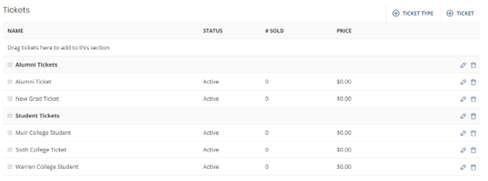
- Click “+ Ticket” to add a ticket option and enter in ticket details.
- You can click “Additional ticket options” under the price field for advanced settings including setting availability date range, number of tickets available and also limit the number of tickets each registrant can add.
- While the system does not currently support paid events, you can still take advantage of the promo code feature by clicking on the “Hidden” checkbox. This will allow you to create a promo code that unlocks a hidden ticket option when a user enters it.
- You can click “Additional ticket options” under the price field for advanced settings including setting availability date range, number of tickets available and also limit the number of tickets each registrant can add.
- If you have multiple ticketing options and want to organize them in categories, you can add a “Ticket Type” by clicking on “+ Ticket Type” to create categories for your user.
- i.e.
- i.e.
- If you have any hidden tickets, create a promo code and select the associated ticket to use the hidden ticket feature. Click “save promo code” to save code.
- Continue to the “Event Capacity” section to add your registration limit.
- Leave it blank if you do not have a capacity limit.
- Click 'Save and Continue'
Collect User Information
Every event will require a name and email address for each ticket. Note, the same email address can be used for multiple tickets.
To collect additional information click on “+ Attendee Question” in the “Attendee Question” section to add a short open field question or a single select multiple choice dropdown field.
Please note: Conditional fields are currently not available in ticketing.
Visit Manage Events help page to learn how to review your registrations.
Option 3: No Ticketing & Registration
- Do not check the “Use Localist Register” box.
- Leave “Ticket Cost”, “Registration Field” and “Eventbrite ID” fields blank.
- Click 'Save and Continue'.
Step 4: Attendee Engagement
Select the fourth tab: 4. Attendee Engagement
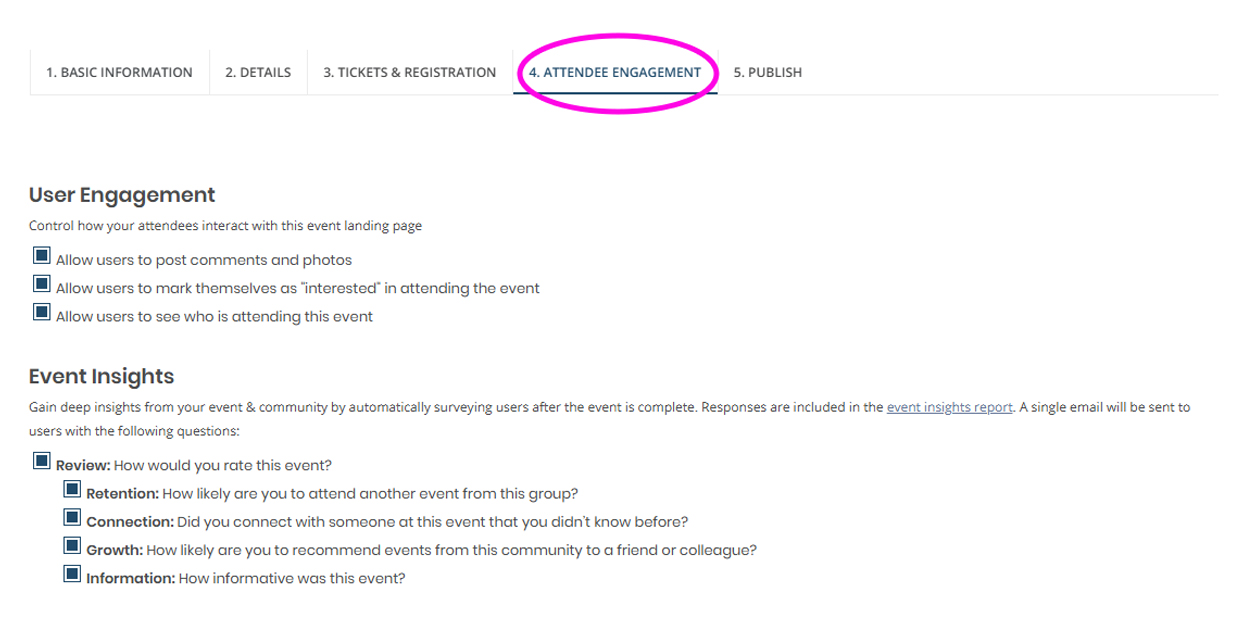
User Engagement
“User Engagement” features have been disabled system wide and cannot be enabled. Please disregard this section.
Event Insights
Collect user insight after the event day. For events using the Localist ticketing system, the platform will send registrants an email with a short survey.
Important! This feature is enabled by default. If you do not want to collect event insights after the event, you can disable this by unchecking the insight options. Click “save” once you have configured your event insights settings.
The feature is limited to the 5 standard questions and currently does not support custom questions. Learn more at Localist’s Event Insights webpage.
- How would you rate this event?
- How likely are you to attend another event from this group?
- Did you connect with someone at this event that you didn’t know before?
- How likely are you to recommend events from this community to a friend or colleague?
- How informative was this event?
To view insights, go to the event’s editing dashboard, click the “metrics” dropdown menu and “insights”.
After you have enabled or disabled your Event Insight settings click 'Save and Continue'.
Step 5: Publish Event
Select the final tab: 5. Publish
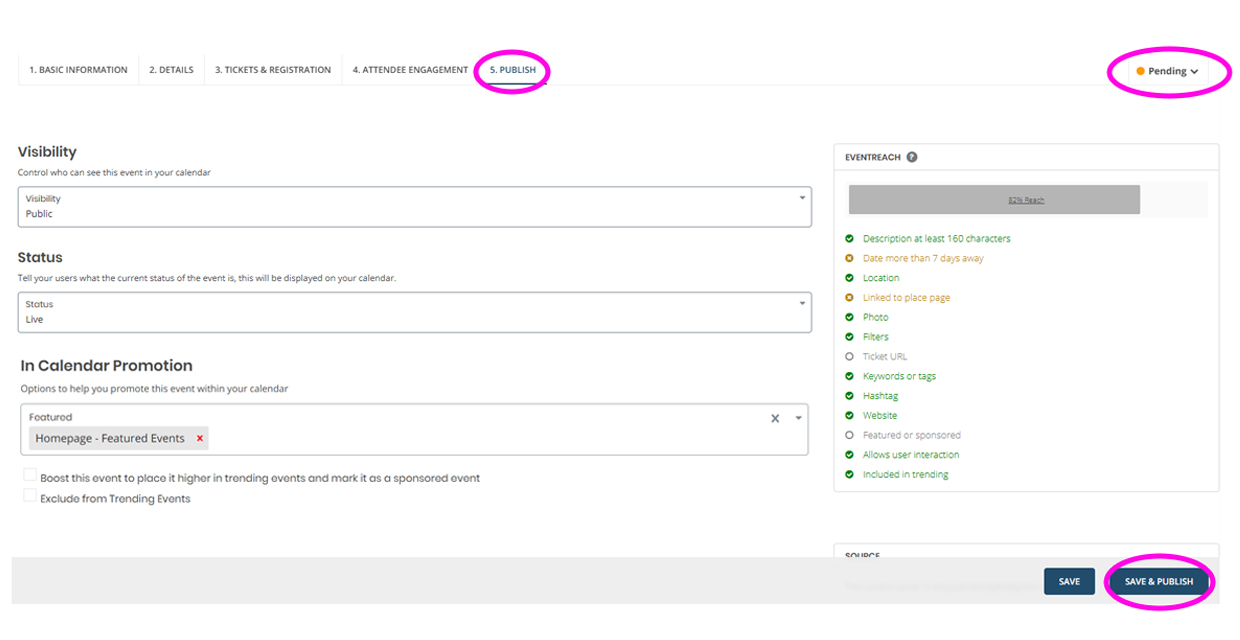
- Review your visibility and event status settings.
- Visibility: Set who can see your event
- Public: Your event will display on the calendar website and any applicable calendar feeds.
- Unlisted: Your event will not display on the calendar website, but can be accessed through the URL.
- Restricted: Users will need to be logged into the platform to view and register for the event.
- Status: Indicate to users the event status
- Use this field to inform users if an event is canceled, postponed, or sold out—without deleting the event page. If the status is anything other than 'Live,' a pop-up message will appear on the event page and listing.
- In Calendar Promotion:
- You can exclude your event from the Trending Events feature on the main calendar site if you want to lower exposure.
- “Trending Events” refers to a list of events ranked by Localist’s EventScore algorithm, which considers factors like popularity and interest. Learn more about the EventScore algorithm.
- Featured: Based on your permission level, you can add the event to the top featured section of the calendar pages (I.E., Student Life).
- Sponsored Event: Check “Boost this event to place it higher in trending events and mark it as a sponsored event” to boost the event in the trending algorithm. This will help send it straight to the top of the trending list. This feature is only available for certain permission levels.
- Exclude from Trending Events: Check this box if you want to exclude from displaying on the “Trending” tab on the calendar listings.
- You can exclude your event from the Trending Events feature on the main calendar site if you want to lower exposure.
- Visibility: Set who can see your event
- Review your event build progress using the checklist in the “EventReach” box to check you have entered the necessary info.
- Click on the “Pending” on the top right of the page and click “Publish” or click on the “Save & Publish” button on the bottom right corner.
- To view your event page, click on “View Event” on the top right.
- After publishing, you will receive an email confirming your event is live.
- Visit the Manage Event help page to learn how to manage your event page as well as your registrations if using the platform's ticketing feature.